Hello and welcome to a new edition of Kids Room Alerts.
I am Sorry. This month I am a day late in sending you my newsletter. Well...yesterday was tough. My daughter just graduated from pre-school 3. She will start pre-school 4 in the Fall. As a father, it is always tough to see your little girl out in the world on her own. She is all of 4 years old but already I am envisioning her at 24 (shudder).
The years fly by so quick and we certainly can't hold them back. So in this issue, I would like to share an easy d-i-y. I thank DesignMom for this tutorial that will have you drooling.
As Father's Day approaches, many fathers are anticipating some thanks-sweetheart-mumble-mumble gifts (translation: mumble-mumble=but what do I do with this?). Why not give back to your child instead...a lovely toddler bed ¨C handmade by YOU. Believe me, it's easier than you thought.
- We have started our new feature on Teen Themes. Here we will showcase some of the most interesting and happening themes in teen rooms. Read more...
- The very first theme to find itself mentioned in the Teen Themes is 'Zebra/Animal Print Theme'. While there are so many zebra themes available, here we give you tips on finding different animal prints to create a black and white teen room. Read more...
- Father's Day is almost upon us. If you have not yet done any shopping for the occasion, check out our list of Father's Day gifts. Read more...
- Don't forget to check out the latest deals and discounts for extra savings. Save more...
We continue to check out more online players to help you find all your decorating solutions under one roof, err, I mean one click?! This month our focus was on Wall Decor. After all this is the easiest and most fun way to create a room's theme.
- WallCandy® Arts: Now isn't that a lovely name for a company providing wall stickers perfect for a kids room? And if you check out their site, you find that it truly is eye candy stuff. And they have also brought in their savvy design to furniture, home decor, playthings, books and more.
- RoomMates Peel and Stick
 : Another big player in the wall decor field, RoomMates peel and stick wall stickers are just the thing you are looking for...if your kid's interests change as quickly as their clothes get short! Murals and wall decals of their absolute favorite characters, custom decals and borders are a sure hit. But my favorite has to be the Mirrors. And the price is pretty cool too. : Another big player in the wall decor field, RoomMates peel and stick wall stickers are just the thing you are looking for...if your kid's interests change as quickly as their clothes get short! Murals and wall decals of their absolute favorite characters, custom decals and borders are a sure hit. But my favorite has to be the Mirrors. And the price is pretty cool too.
Once your baby is ready to move out of the crib, you simply have to find him a toddler bed. A crib can be quite dangerous for an overgrown baby, since it is much higher and the child tends to move a lot in his sleep at this age. You need a bed that is lower to the ground and also gives him space.
Of course, if you have invested in a convertible crib, you are in luck. But if you are expecting a second addition to the family, the crib will have to stay as is. Give your toddler a bed to fall in love with. Some day he will appreciate your hard work too.
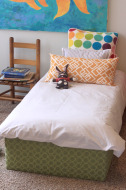
Here is a step by step guide to help you build your own toddler bed...and upholster it in your own style.
[If you do refinish one of your own or have an easy tutorial for another project, remember to share it with us...and you might find yourself featured in our next e-zine issue! Simply email us at Kids_Room_Alerts@thisdecormom.com]
Just so I do not miss any important steps, I have re-printed her tutorial as is.
Part one: Build the base.
Materials to Build Two Beds (about $25):
-4 pieces plywood, 3/8" thick. 10" x 51"
-4 pieces plywood, 3/8" thick. 10" x 25"
(I had these pieces cut from one 4'x8' piece of 3/8" plywood that cost $8.)
-4 pieces of 2" x 2" wood. 48" long
(I bought one 2 x 2 board that was 8' long and had it cut in half. They are about $3 each.)
-2 pieces plywood, 1/4" thick. 24" x 48"
(These are typically available in this exact size for about $3 at Home Depot.)
-Screws #6, 1 1/4 inch.
(A box of 100 sells for about $5.)
-drill.
Directions:
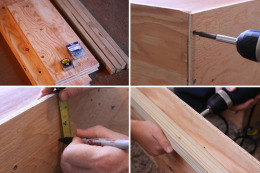
-Make a rectangular box with the 10" pieces of wood. Two short pieces and two long pieces. Attach with 3 screws on each side. This is easier if you pre-drill.
-On the long sides, make a mark at 2.5 inches along the outside and at 2 inches along the inside.
-Align one piece of the 2 x 2 inch wood so that the top hits just under the inside marks. Use clamps to brace or have a helper hold in place.
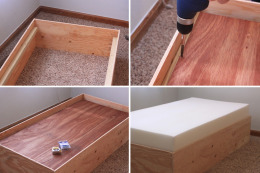
-From the outside of the box drill in along the 2.5 mark at 5 places along the rail. Repeat on other side of box.
-Lay 24 x 48 plywood on rails. Attach with 2 screws on each side.
And that's it. The mattress will rest inside the two inch lip. Don't worry if the box is a bit rough ¡ª if the screws aren't perfectly aligned, etc. The box will be completely covered by fabric.
Before you start cutting wood, please read these Notes on Mattress Size:
I didn't include the price of the mattress in the project because most people in need of a toddler bed will already have a crib size mattress from their crib. If you do plan to use a standard crib mattress, you'll need to make adjustments to the size of the base. Standard crib mattresses are 52¡å x 26¡å, which will be a bit too big for this base. But be sure to measure the mattress you own. They vary. My crib mattress has been used by 5 kids and is failing. So we ordered two custom ones to fit the bases I'd designed. We ordered them from: The Foam Factory. 6 x 24.5 x 49.5 inches. $48 each. Free shipping if your order is over $75. So place your order with a buddy.
Part two: The Upholstery.
Materials to Upholster (about $50):
-One full-size or queen-size package of hi-loft cotton batting
(This was $25 at JoAnns. Watch for sales or coupons and I'm sure you could get it cheaper.)
-About 4.5 yards of fabric. You could use much less if you don't mind seaming it together. For each bed, you'll need a strip of fabric 16 inches wide by 4.5 yards long.
(Fabric prices vary so much, that it's hard to put this in a budget. In the $75 I mentioned in the title of this post, I'm allotting $25 for fabric. You could certainly spend more. And if you¡¯re a bargain hunter, you could for sure spend less.)
-staple gun and staples
Directions:
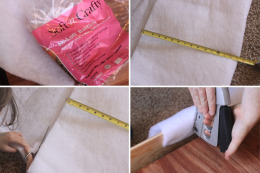
-Roll out your cotton batting and fold over so you have a double thickness.
-Cut into 3 double-thick strips about 15 inches wide each. For each bed, you'll use about 1 1/2 lengths of this double thick, 15 inch wide batting.
-Place the folded edge of the batting over the top edge of the bed frame. Attach it to the bed frame with a staple gun.
-Trim the corners, so that you can attach them more securely.
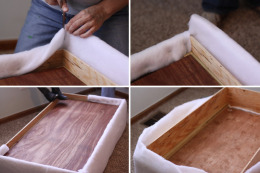
-Keep wrapping the cotton around until your length runs out. Then add the next length.
-Turn the bed over and pull the batting tightly around the bottom edge. Staple away.
-Once the batting is secure, it's time to add the fabric.
-Measure and cut the fabric so that you have a 16 inch wide piece that is approximately 4.5 yards long. You could also piece 16 inch lengths together to make one long strip.
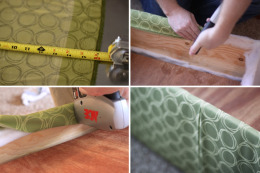
-Starting on the bottom of the bed, staple the fabric over the cotton batting.
-At the corners, just fold and staple tightly.
-Once you've gone around the bottom, turn the bed over. Fold the fabric underneath itself so the edges don't fray, and staple the fabric over the cotton on the top edge as well.
-Where the fabric joins, fold the edge underneath itself and staple tightly. I put my seam at the head of the bed - that way it's hidden against the wall.
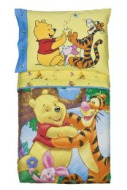
Getting the toddler bed ready is only half the story though. Now you need some good toddler bedding to complete the look. Isn't this Winnie the Pooh bedding absolutely perfect? The colors are vibrant and the setting is idyll. Don¡¯t throw the old crib sheets away yet; with night-time 'accidents' they will come in very handy.
There are many more different themes for Toddler Bedding that you can choose from.. that you can choose from..
This newsletter is our way of getting to know you better. Is there something specific that you would like to see on our site or in our e-zine? Tell us what you like and do not like (really?) about our site. Get in touch with us and make your voice heard.
Dad, you're someone to look up to no matter how tall I've grown. ~Author Unknown
New! Comments Was there something special on this page that you loved? Then, leave me a comment in the box below. (Please remember this is a kid-friendly site.)
|


